
- Phasmophobia Ghosts Guide - January 1, 2023
- No Man’s Sky Base Ideas - September 16, 2022
- Best Survival Mechanics In Non-Survival Games - September 7, 2022
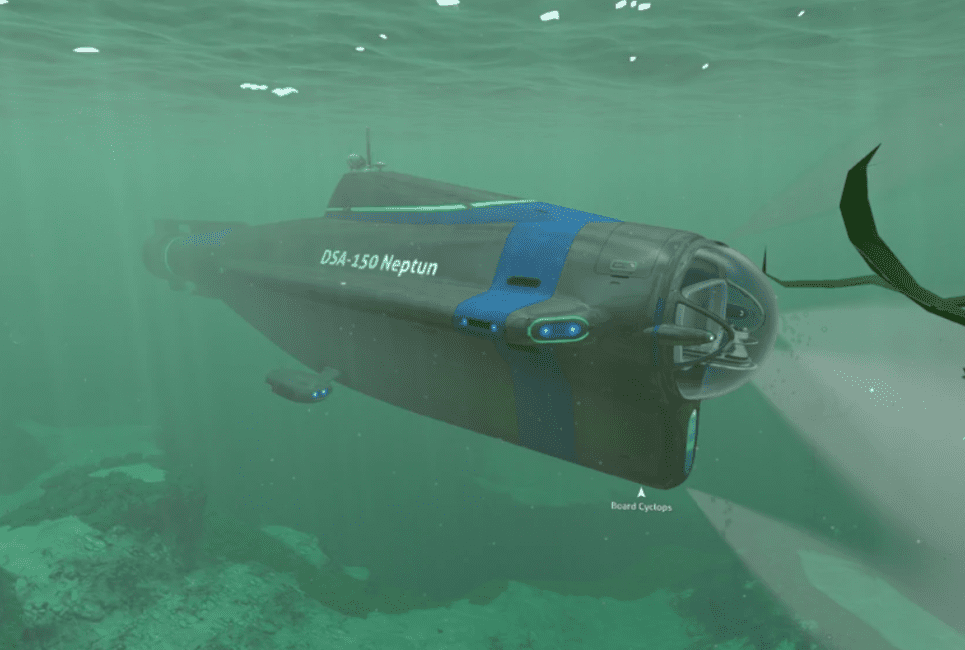
One of the key parts of finding success in Subnautica is crafting various ingredients and recipes to help players survive in the alien ocean they’ve crash-landed on. To do so, they can make new suits, upgrades, and even build a sprawling base that dominates the sea floor with glass walls and various crafting stations. To reach the deepest ocean regions, players have to build a massive submarine known as the Cyclops, the star of this Cyclops Subnautica guide.
Key Info Up Front
- Vehicle Health: 1500
- Blueprints: Cyclops Hull, Cyclops Engine, Cyclops Bridge
- Speeds: Slow, Standard, Flank
- Required Materials: 3x Lead, 1x Lubricant, 3x Enameled Glass, 3x Plasteel Ingot, 1x Advanced Wiring Kit
Cyclops Overview
The Cyclops is a unique vehicle in Subnautica because it operates as both a submarine and a portable mini-base. This makes getting the Cyclops to redefine how players approach problems in Subnautica. It allows them to travel to entirely new areas while also getting out of the pilot’s seat and moving around the submarine’s interior to interact with different workstations or embark out into the water.
However, for players to keep the Cyclops up and running, they have to keep it powered with power cells. The vehicle’s power drain depends on various factors that players have to balance, such as the submarine’s upgrades, how quickly it is moving, and what systems are all being used. Suppose the Cyclops runs out of power without the player having extra power cells handy.
In that case, they’ll find themselves stranded, which can be very dangerous when adventuring in some of the more hazardous locations in the ocean. To make things even worse, when the Cyclops runs out of power, it stops producing oxygen, which means the player has a limited time to try and get to the surface or another air source before they drown.
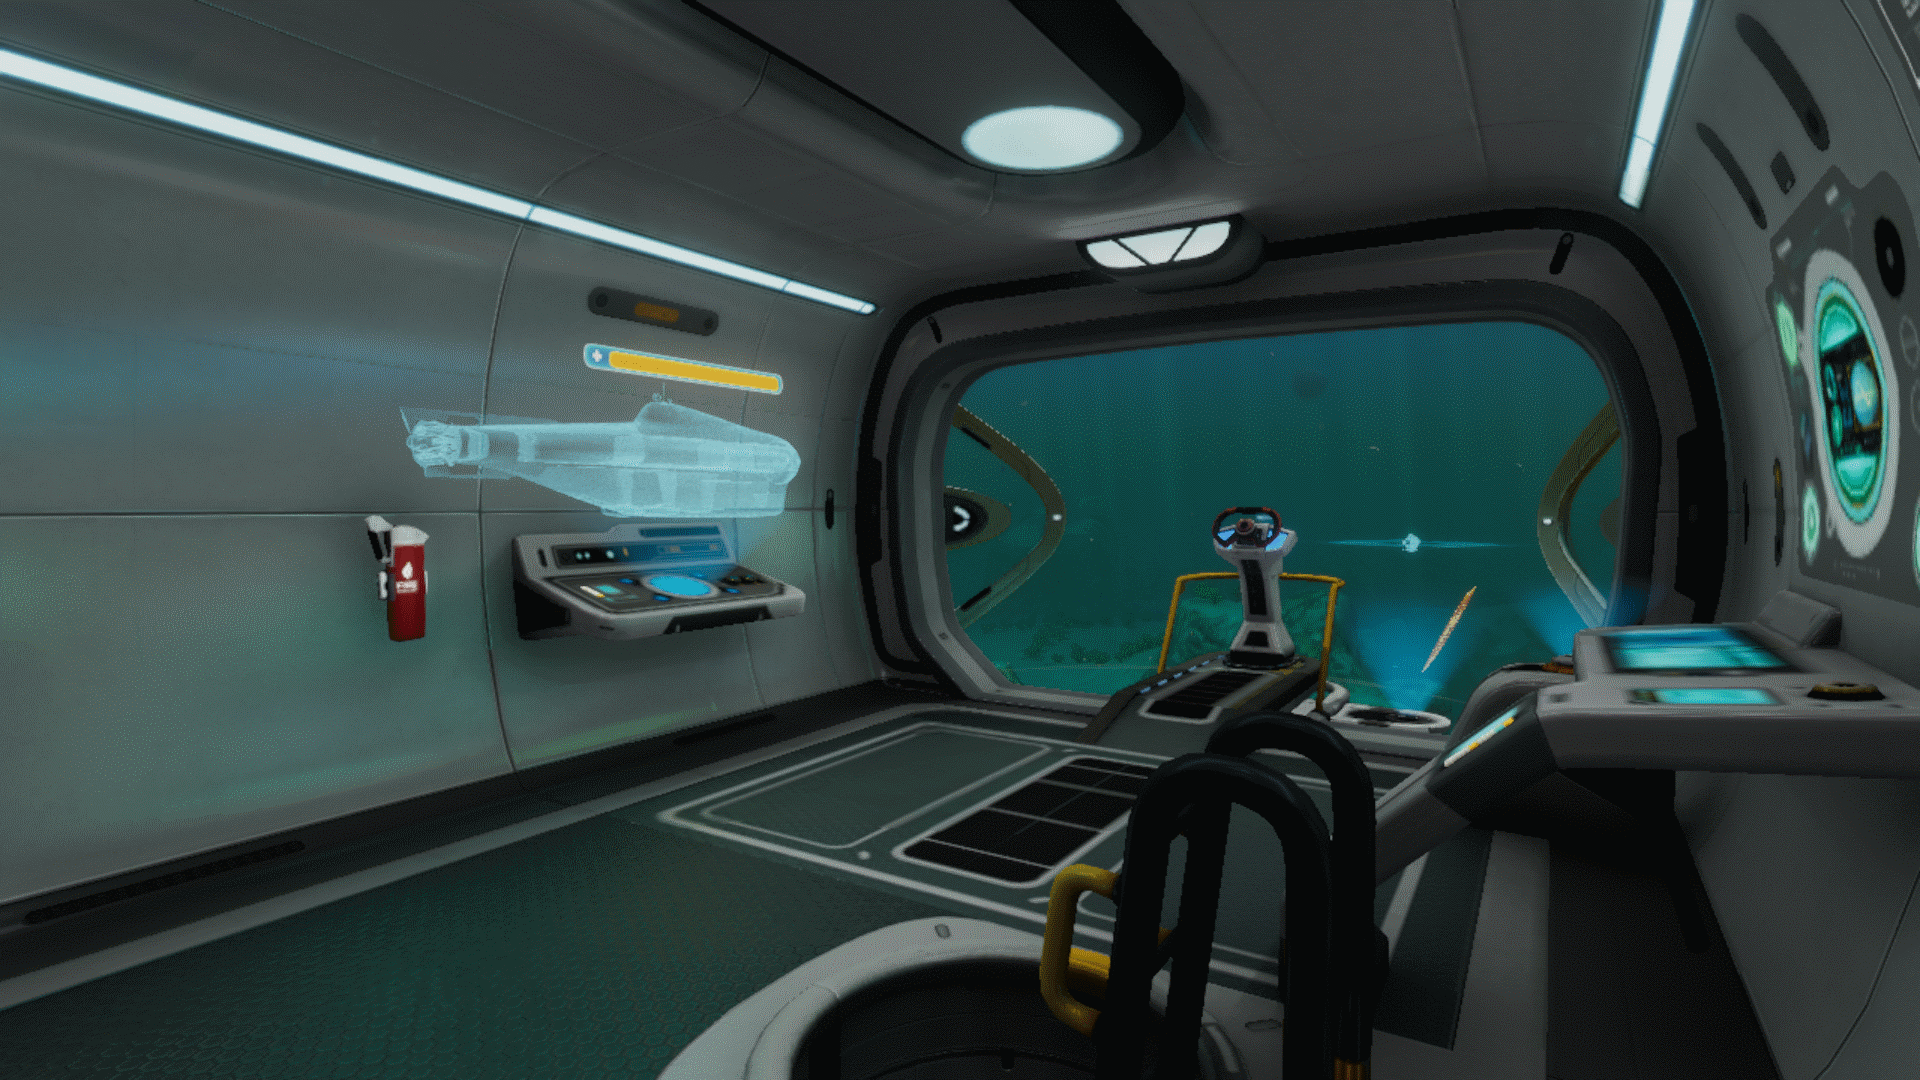
When operating the Cyclops, players must be aware of its health and how much damage it sustains. The Cyclops has 1,500 health, and none of its upgrades can improve that number. However, 300 of those hit points represent the submarine’s overshield, meaning that they can regenerate on their own after sustaining some damage.
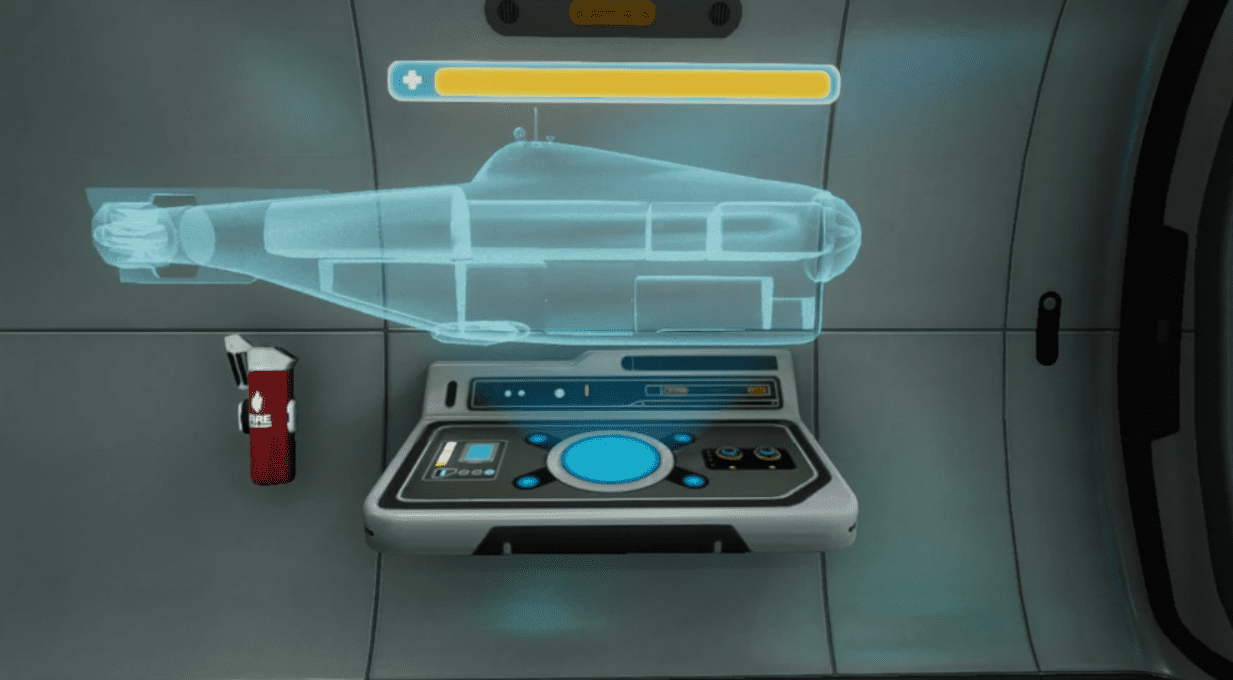
Any damage is taken by the Cyclops that is greater than what the overshield can absorb results in hull breaches. These can only be repaired by exiting the submarine and using a repair tool, but they can be found by consulting the hologram by the submarine’s controls that show the approximate area of the breaches.
Damage can also cause fires to break out inside the Cyclops, which causes further damage to the sub over time and damages the player if they are on board. The smoke that the fires produce can also block the player’s vision while piloting the Cyclops, which can be very dangerous. These fires can be dealt with using an extinguisher or installing the Fire Suppression System upgrade, which is detailed below.
Another threat to the Cyclops’ health is its crush depth. When it is first created, the Cyclops can dive down to 500 meters beneath the surface before the pressure of the water begins crushing the Cyclops and damaging it. This can also be improved with upgrade modules, increasing the submarine’s ultimate depth to 1,700 meters.
If you find yourself unable to manage the Cyclops’ health, it will eventually explode. The onboard AI will give you a warning so that you have some time to exit the submarine beforehand, but there are some things to remember regarding how the explosion works. Firstly, if you are in the sub when it explodes, you will be instantly killed, and any docked vehicles like the Seamoth or Prawn Suit being destroyed.
The Cyclops will then become a wreck at the bottom of the ocean with a few openings to ensure you can retrieve any placed items, items kept in storage, or the upgrades panel. You can also recover the power cells afterward, although they will have no charge remaining. Finally, when a Cyclops explodes, it will be marked with a beacon so that you can return to it later and retrieve anything that you want from the wreck.
Cyclops Noise
While operating the Cyclops, it is also essential to consider how much noise it generates. Every aspect of the Cyclops’ operation emits a certain noise level, with the higher noise levels reaching a greater distance. Any aggressive creature in the range of the noise will then be drawn to the Cyclops, and just how far the noise is coming can be read using the blue spheres of the sub’s sonar HUD.
Suppose you are traveling through a particularly hostile region of the ocean. In that case, you can activate Silent Running mode to half the amount of noise generated at the cost of additional energy usage. However, this will not prevent a creature that visually sees the Cyclops from still attacking them.
Cyclops Blueprints
Like almost every craftable object in Subnautica, players have first to find and scan blueprints to get the recipe for creating the Cyclops. However, the Cyclops is unique in that it has three different components, each with three fragments that need to be scanned before being made. These blueprints are the Cyclops Hull, Cyclops Engine, and Cyclops Bridge. Completing each blueprint type will increase the overall completion of the Cyclop’s blueprint by 33% until the player can fully build it.
The fragments for the Cyclops Hull can be found in the Mushroom Forest and Sea Treader’s Path areas. If you’re looking for pieces of the Cyclops Engine, you’ll instead want to explore the Aurora, Crag Field, Mountains, Crash Zone, and Underwater Islands Wreck areas. Finally, for the Cyclops Bridge fragments, head to the Sea Treader’s Path, Crash Zone, or the Mushroom Forest.
It is important to note that all of the fragments have an exceptionally high chance of spawning on the eastern side of Mountain Island, but searching there for them should only be attempted by experienced layers, as there is a Reaper Leviathan and a Boneshark that both search the area frequently and they spawn deep underwater.
Building the Cyclops
Once you have all the fragments, you’ll be ready to start gathering the resources necessary to build the Cyclops. Before even attempting to build it, however, you’ll have to make the Mobile Vehicle Bay, where you can use the resources to fabricate the submarine. You will also have to ensure that the Mobile Vehicle Bay has enough water underneath it to have room for constructing the vehicle. Otherwise, you will get an error message telling you that it can’t be built.
First, you’ll have to make one unit of Lubricant, which can be done by taking a Creepvine Seed Cluster to a basic fabricator. You’ll also have to create an Advanced Wiring Kit. To get that, you’ll first have to make a regular Wiring Kit out of two Silver Ore before combining that with two units of Gold and one Computer Chip at a fabricator.
The Cyclops also requires three Enameled Glass, which means you’ll have to gather three pieces of Glass and three Stalker Teeth as well. While you search for those, make sure to grab three units of Lead that you’ll need by themselves as well as one Titanium Ingot and two Lithium to produce a Plasteel Ingot.
Read also: Comprehensive Subnautica Silver Ore Guide.
Operating the Cyclops
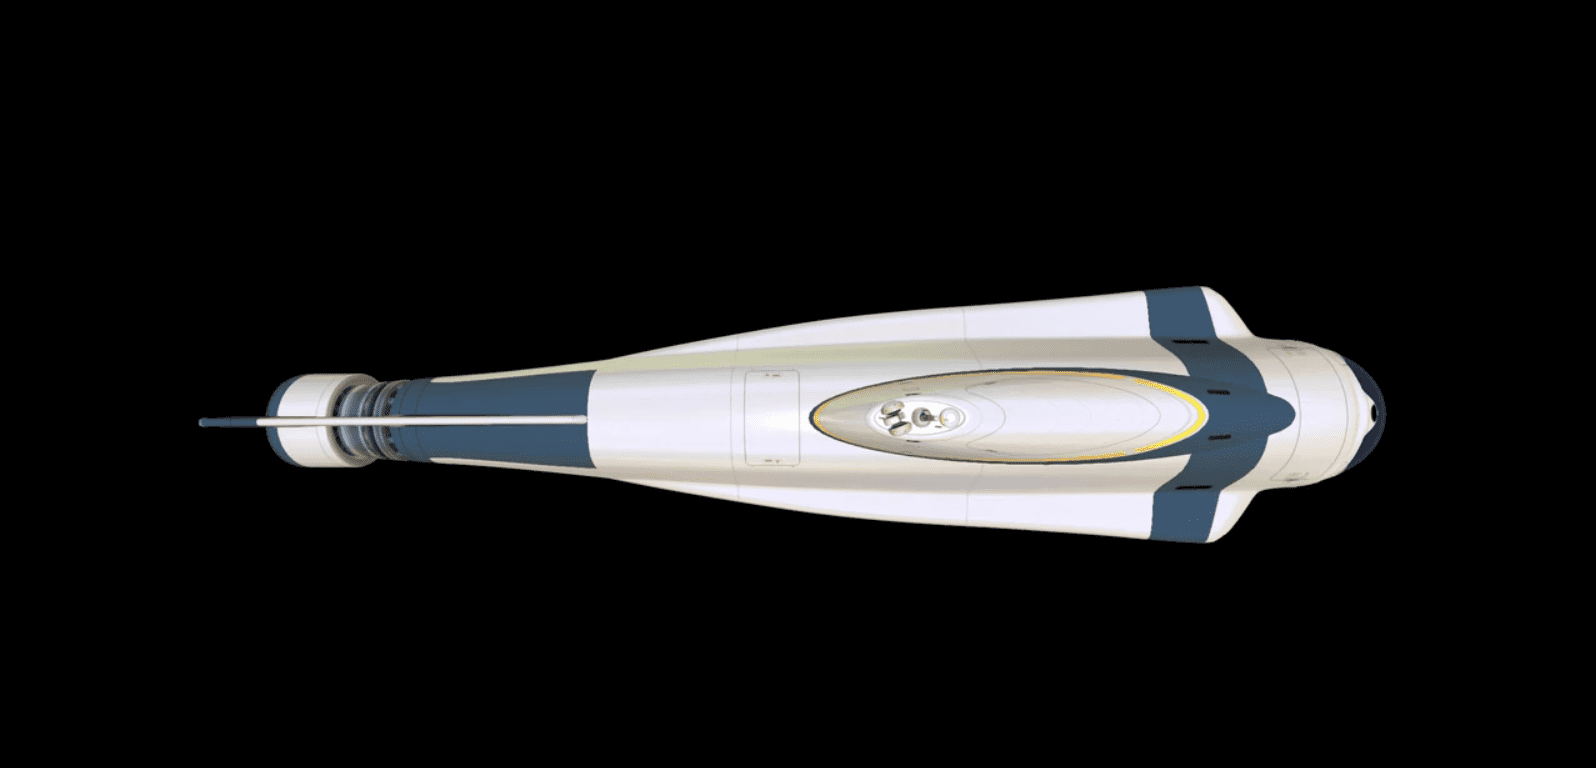
Once you have your Cyclops built, you’ll want to familiarize yourself with its different areas and three different HUDs so that you can operate it effectively while taking it out. The main body of the Cyclops is divided into six different sections.
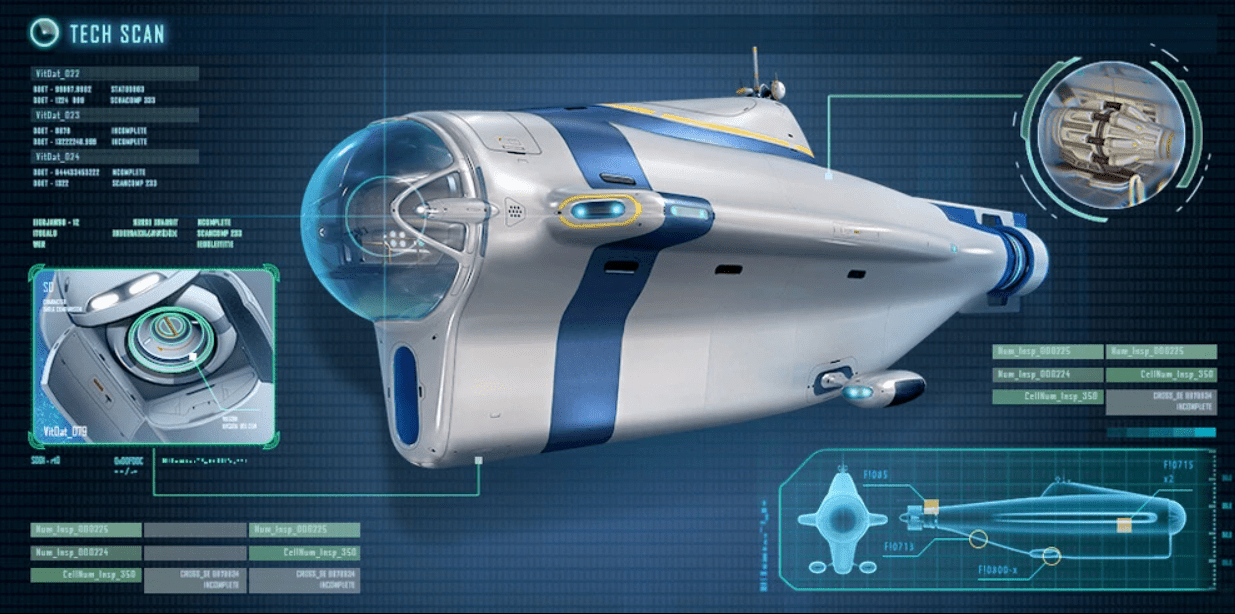
The first is the Bridge, located at the front of the Submarine and easily identified by its massive glass dome that allows you to see in front of the submarine while you pilot it.
This is where you will spend most of your time while in the vessel and where you can find its three HUDs.
- The first HUD is the Pilot HUD, which you can see best once you assume control of the cyclops. This HUD displays a ton of information, including its health, noise emissions, a compass, engine power, and the sub’s current depth.
- The second HUD is the Port HUD, which is located on the left side of the Bridge and displays the damage the Cyclops has endured and the general location of any hull breaches that require repair.
- Finally, the other side of the Bridge houses the Starboard HUD, which allows you to customize further the appearance of the Cyclops, which will be expanded on in more detail below.
The second region of the Cyclops is its Upper Midsection. This area functions mostly as a hallway connecting the Bridge to a few other sections of the vessel but also houses the Upgrade Console that allows the player to add upgrades to the Cyclops, detailed below.
This area is also large and open enough to allow the player to use it for placing various workstations and other stationary items to expand further the utility provided aboard the Cyclops. This area is also home to the Creature Decoy Tube, where you can load Creatures that can then be deployed to distract hostile creatures and keep them from attacking your Cyclops.
Then there is the submarine’s Engine Room. Located at the back of the vessel, the Engine Room houses its six power cells and the fabricator station that can be used to craft the various upgrades to improve your submarine’s performance. There is also the Vehicle Bay, where players can dock either the more miniature submarine known as the Seamoth or a Prawn Suit mech to take on their expeditions with them. While the vehicles are docked, they will be charged and can be repaired using energy from the Cyclops’ power cells.
There is also the Keel section, home to a handful of lockers for players to store resources and materials inside. Finally, there is the Aft section just below the Engine Room.
This section mainly functions as a path from the Engine Room to the Vehicle Bay, but its walls have room to add some utility through lockers or even a fabricator.
Cyclops Upgrades
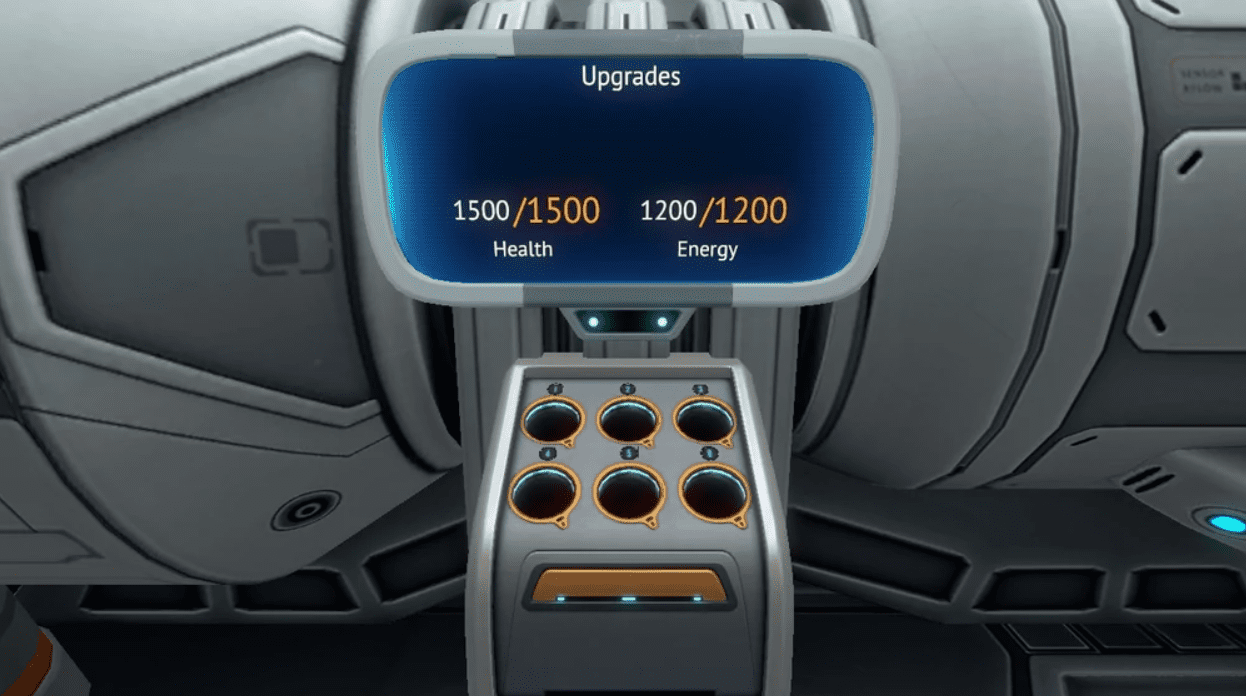
Building the Cyclops is far from the end of the journey, however, as the Fabricator located in the Engine Room can be used to craft numerous upgrades that can be slotted into it to improve its performance. These upgrades and the resources necessary to obtain them are below.
Cyclops Depth MK I
Ingredients: 1x Plasteel Ingot, 3x Ruby
Description: This upgrade allows the Cyclops to comfortably descend to depths of up to 900 meters before taking any crush damage.
Cyclops Depth MK II
Ingredients: Cyclops Depth MK I, 1x Plasteel Ingot, 3x Nickel Ore
Description: This upgrade further increases the Cyclops’ depth capabilities, allowing it to descend to 1,300 meters before suffering crush damage.
Cyclops Depth MK III
Ingredients: Cyclops Depth MK II, 1x Plasteel Ingot, 3x Kyanite
Description: This final upgrade for the Cyclops’ depth rating allows it to reach an incredible 1,700 meters beneath the ocean’s surface without any additional damage.
Engine Efficiency Module
Ingredients: 1x Comput Chip, 1x Benzene, 1x Polyaniline
Description: Equipping this upgrade to the Cyclops improves its energy usage by recycling the waste generated by the sub’s engines to recharge its batteries. In a mechanical sense, this triples the submarine’s efficiency, which decreases the energy use of the sub’s aspects by 75%.
Thermal Reactor Module
Ingredients: 2x Polyaniline, 4x Kyanite, 1x Wiring Kit
Description: The Thermal Reactor Module allows you to recharge your Power Cells by harnessing energy from areas of the Cyclops that reach temperatures higher than 35 degrees Celsius.
This allows you to keep your sub at a comfortable temperature and turn the heat into a positive resource. Depending on the temperature, it will also charge your power cells at an increasing rate. The relationship between temperature and charge rate is below:
| Temperature (Celsius) | Temperature (Fahrenheit) | Charge Rate |
| 35 | 95 | 10% |
| 50 | 122 | 18% |
| 65 | 149 | 26% |
| 80 | 176 | 34% |
| 95 | 203 | 42% |
| 110 | 230 | 50% |
Sonar Module
Ingredients: 1x Computer Chip, 3x Magnetite
Description: Once this upgrade is installed, it allows you to emit a sonar wave from the Cyclops, which maps out the topography of the surrounding area.
This information is then displayed on the Pilot HUD, allowing you to use it while navigating the ocean floor with the vessel.
See also: Magnetite Subnautica Guide.
Fire Suppression System Module
Ingredients: 2x Aerogel, 2x Crystalline Sulfur
Description: The Fire Suppression System Module adds an automated system that activates when fires are detected on the Cyclops. Once activated, it will put out fires within just a few seconds to preserve as much hull integrity as possible and save you from having to use an extinguisher. After the system has been activated, it can not do so again until it takes a short while to recharge.
Docking Bay Repair Module
Ingredients: 1x Repair Tool, 1x Copper Wire
Description: This upgrade is a straightforward but very helpful one. It makes it so that they will be automatically repaired when you have a Seamoth or Prawn Suit docked in the Cyclops’ Vehicle Bay.
This effect consumes energy from the submarine’s power cells, so you’ll have to monitor that, but it can help save you time from manually repairing them while out exploring or gathering resources with the sub.
Creature Decoy Tube Module
Ingredients: 3x Titanium, 2x Lithium, 1x Aerogel
Description: This upgrade increases the number of Creature Decoys that can be loaded into your Cyclops’ Creature Decoy Tube at once from one to five.
This upgrade vastly improves your ability to avoid damage and confrontation from hostile creatures.
I recommend getting it before you try exploring areas known to have many Leviathans or Bonesharks.
Shield Generator Module
Ingredients: 1x Advanced Wiring Kit, 1x Polyaniline, 1x Power Cell
Description: Equipping this upgrade allows you to activate an electromagnetic shield that surrounds the Cyclops for a limited period. While the protection is activated, all hostile fauna are repelled from it, and incoming damage is negated.
This allows you to navigate the most hazardous areas in Subnautica for much longer without destroying your Cyclops and having to build a new one.
Cyclops Customization

Customizing your Cyclops can help it feel much more like a home away from home rather than a metal tube that happens to carry you inside of it. There are two ways you can customize your Cyclops, and while neither is as in-depth as Subnautica‘s base building mechanics, there are still plenty of good options to choose from. The first is accessed via the Starboard HUD in the Bridge area of the vessel.
This HUD menu allows you to customize the submarine’s external and internal elements. For the internals, you can only change turn the ship’s lights and floodlights on and off, but if you have it in Silent Running mode, you should know that neither can be turned on.
For external customization options, you can customize the sub’s color scheme from various options. You can also christen the Cyclops with a name, which will appear on its beacon and on the side of its main body. The term can be anything up to fourteen characters long.
The second customization option comes from placing objects and stations around the interior of the Cyclops. You can find room to put things wherever you want, but the Upper Midsection and Aft Section are the two primary places where most players place items because of their empty space. How you customize these areas is entirely up to you, but I recommend considering two things.
The first is what utility you would like the placed objects to bring to the Cyclops. While the vessel can do a lot independently, setting a few fabricators or other stations can make things much easier when you are out exploring or gathering resources. Building required items, survival materials, or even upgrades on the go will help save you from having to drive back to your base frequently.
I also highly recommend adding additional storage to the Cyclops. This will ensure that you can bring materials with you to fabricate supplies on the go and allow you to gather any rare resources or desirable you find along the way on your travels.
I also recommend considering the second element of placing objects, which is your Cyclops’ interior design. While this isn’t nearly as mechanically important as your items’ utility, it can make a big difference in how much enjoyment you get from using the Cyclops. Since you’ll be using the Cyclops quite a bit in the later stages of your playthrough, enjoying being in it and how it looks will make that time much more pleasant for you.
ou can do this by placing decoration objects around. Still, you should also consider how you put the utility-focused things so that they don’t get in the way of your movement or look odd in a way that might stick out to you whenever you disembark in the Cyclops.
FAQs
Question: What is the point of the Cyclops in Subnautica?
Answer: The Cyclops acts as a mobile base, allowing players to explore for more extended and reach new areas of the world while bringing tools and resources along with them.
Question: Can Leviathans destroy the Cyclops in Subnautica?
Answer: Yes, Leviathans and Bonesharks should be considered very dangerous even while operating a Cyclops, as it has a limited health pool and can be destroyed if you aren’t careful.
Question: Can you dock the Cyclops in the Moonpool?
Answer: No, the Cyclops cannot be docked in the Moonpool or with your base. However, if you are playing on a PC, a mod allows you to do so.
Conclusion
The Cyclops is one of the unique parts of a Subnautica playthrough and is a real standout of the entire experience. Building a submarile from scratch is not only a rewarding experience but being able to use it than to explore the ocean further and bring essential elements of your hard-crafted base along with you is even better. Overall, the Cyclops is one of my favorite parts of the game, and taking full advantage of it can help make your playthrough much more enjoyable.